Embed payments
Checkout Widget for Any Website: Card, Crypto & Bank Transfer (2026)
Add a plug-and-play embeddable checkout widget to any website in two lines of code. Accept card, crypto and bank transfer with PapelShip's e-commerce auth and payment platform.
You already have a website. It might be a landing page built in Framer or Webflow, a documentation site, a WordPress blog or a single HTML file. What you don't want is to rebuild it around a shop just to take payments.
An embeddable checkout widget solves exactly that. You keep your site as it is, drop in a script and a button, and customers pay without ever leaving the page. This guide shows how it works, how to set it up with PapelShip and how to get the most out of it.
What is an embeddable checkout widget?
A checkout widget is a payment window that opens on top of your existing page. The customer clicks "Buy", picks a payment method, pays and receives their product, all inside the widget. Your site never handles card numbers or wallet addresses, and you don't maintain a separate store.
Compared with sending customers to a hosted store, an embedded checkout keeps them in context, which usually means fewer abandoned purchases. Compared with building your own checkout, it saves you the payment integrations, the order logic and the delivery system.
Add the widget in two steps
The PapelShip widget needs one script, loaded once per page, and one attribute on any element you want to turn into a checkout button.
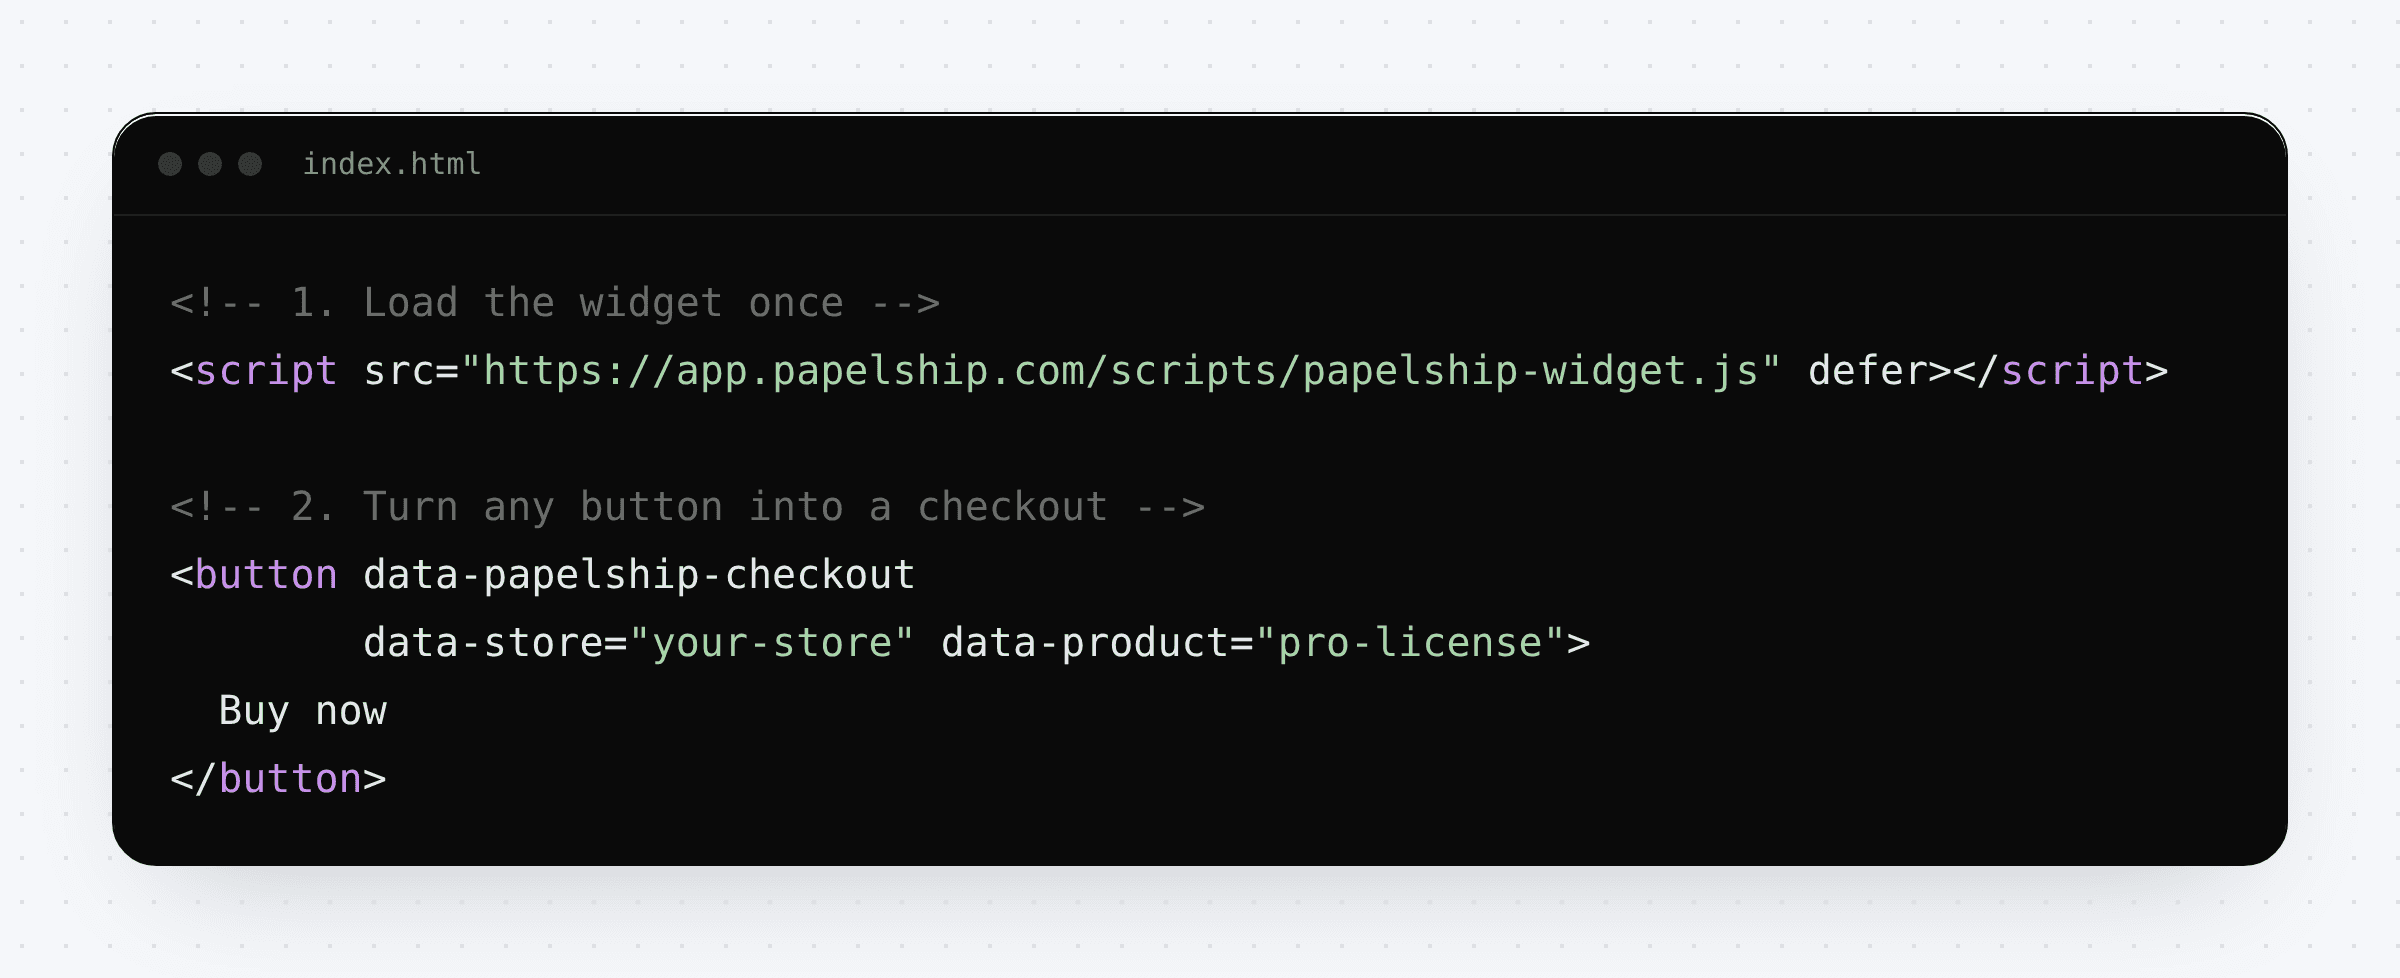
Step 1: load the script
Add the widget script to your page, ideally just before the closing body tag or in your site builder's custom code area. It is loaded with defer, so it does not block your page from rendering.
Step 2: mark a button
Add data-papelship-checkout to any button or link, along with your store identifier and the product you are selling. When a visitor clicks it, the widget opens for that product.
You can generate the exact snippet for a product from the embed builder in your PapelShip dashboard, so you never have to type identifiers by hand.
Configuring the widget
Everything about the widget is controlled with data attributes on the button, so different buttons on the same page can sell different things:
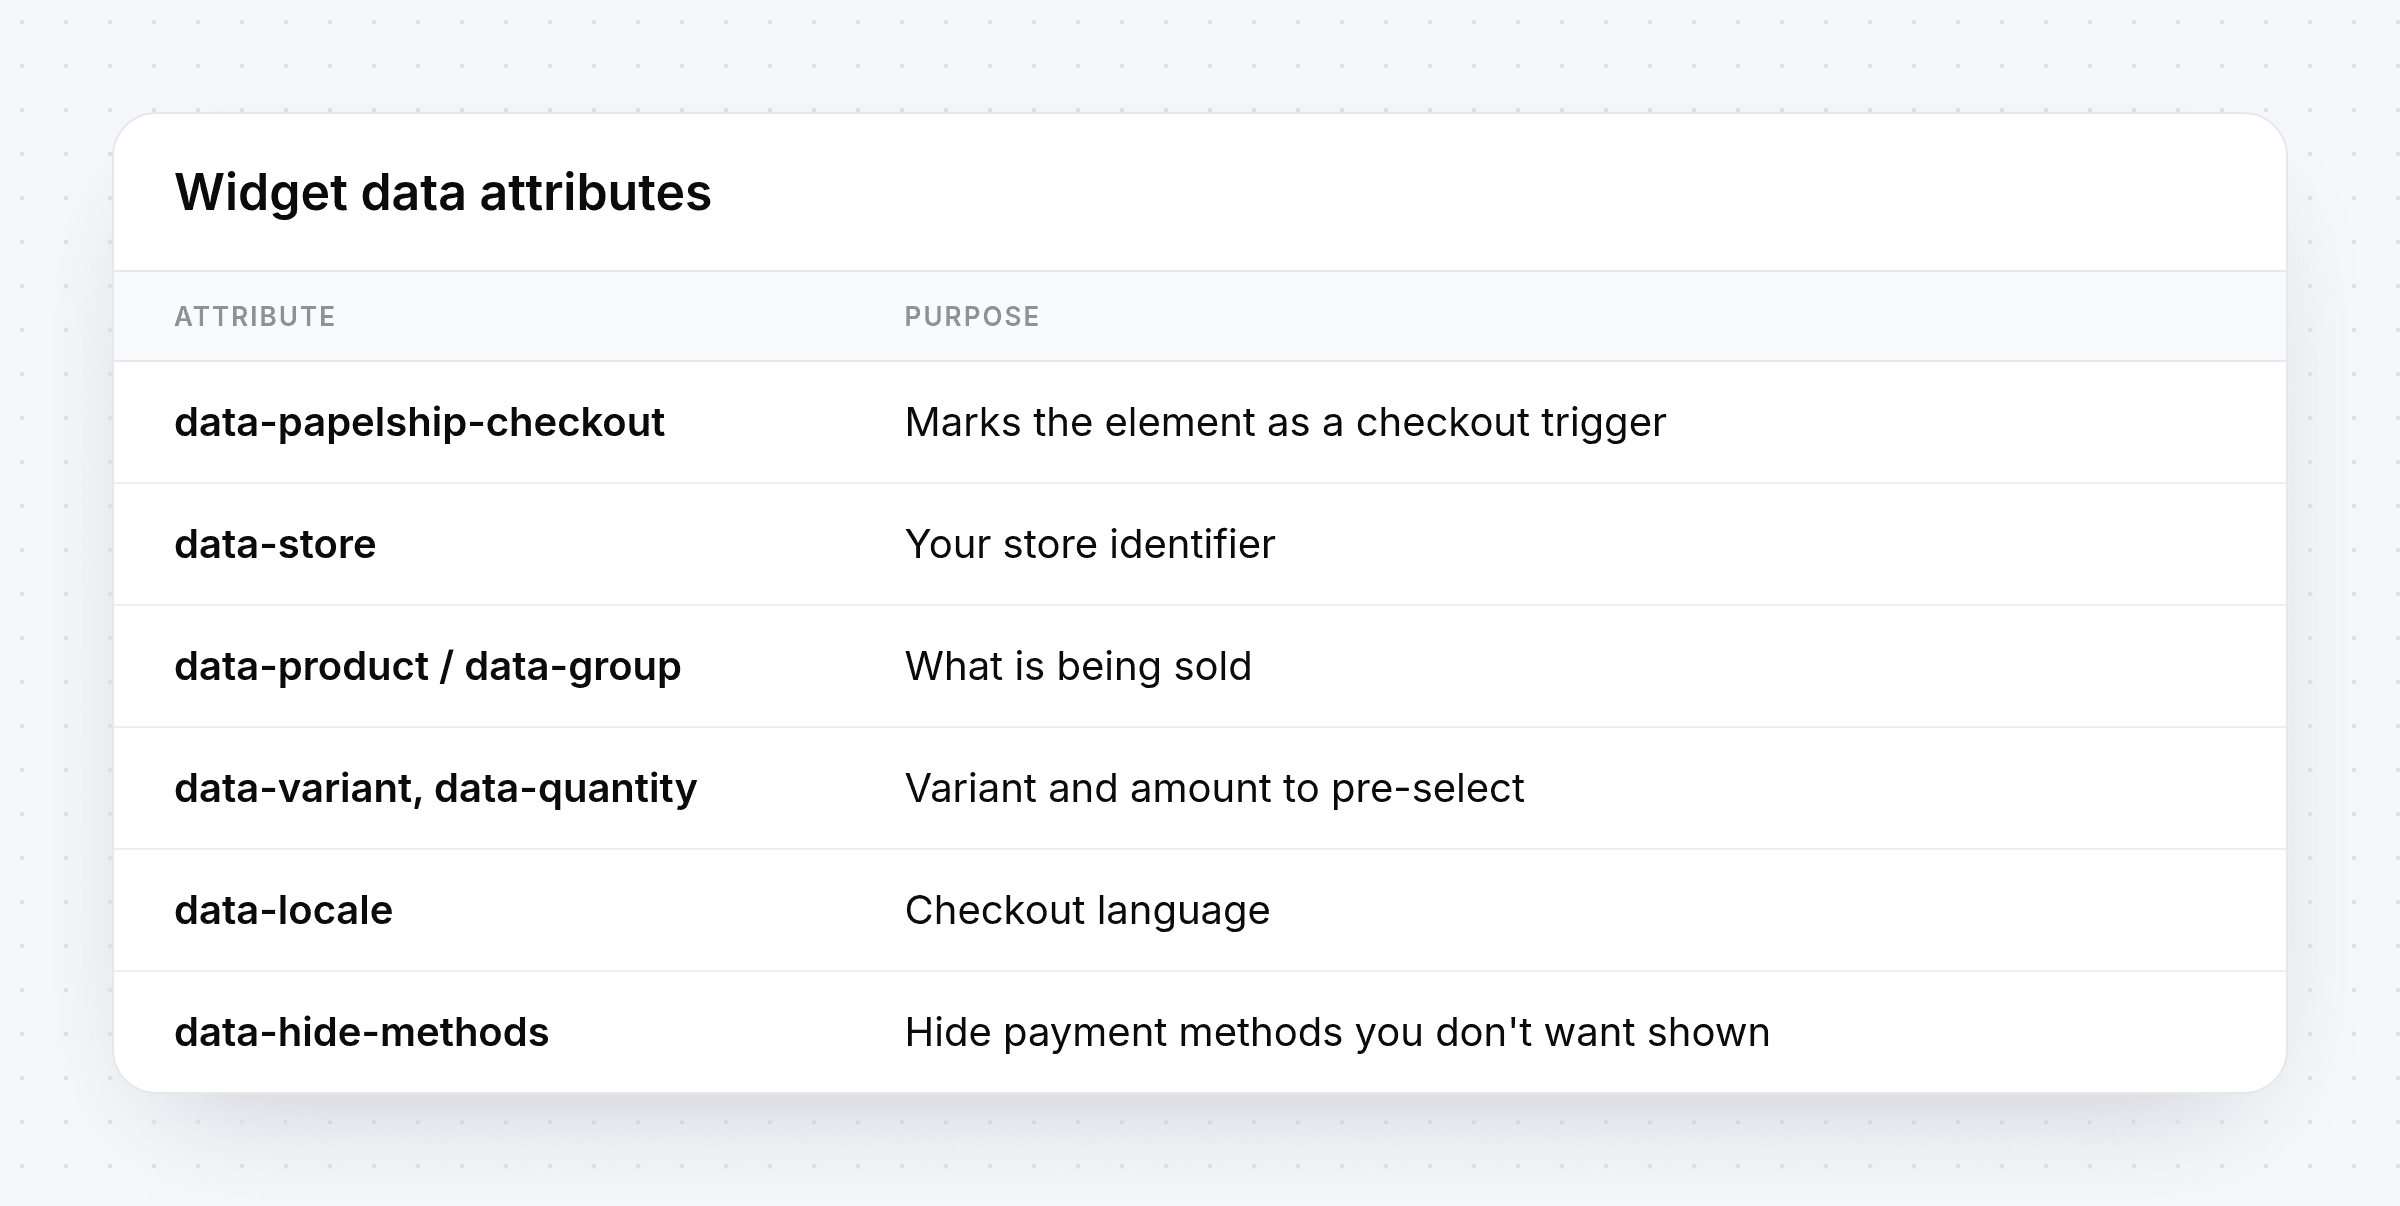
A few practical patterns:
Pricing pages: one button per plan, each pointing at a different product or variant.
Product families: point a button at a product group and let the customer choose inside the widget.
Localised pages: set the locale so the checkout matches the page language.
Simplified checkout: hide payment methods that don't fit a particular product.
Payment methods inside the widget
The widget is a full checkout, not a redirect. Depending on what you enable for your store, customers can pay with:
Card, through the card gateway connected to your store, such as Stripe, PayTR or iyzico.
Crypto, including BTC, ETH, LTC, USDT and USDC, with network selection for stablecoins and on-chain confirmation tracking.
Bank transfer, with a reference and manual review on your side.
Offering several methods in the same window is one of the simplest ways to lift conversion for an international audience: the customer who can't use a card simply pays another way.
What happens after payment
Because the widget is backed by the same order system as your PapelShip store, payment and delivery are connected:
The payment completes (immediately for cards, after confirmations for crypto).
The order is created and appears in your dashboard.
The product is delivered: a license key, a download, or an action triggered by your webhook.
The customer gets a receipt.
There is no webhook bridge to build between a separate store and your delivery system.
Widget vs hosted store vs payment links
Option | Best for | Customer leaves your site? |
|---|---|---|
Embedded widget | Existing websites and landing pages | No |
Hosted storefront | A full catalogue on your own domain | Yes, to your store |
Payment link | Selling in chat, email or social posts | Yes, to a payment page |
Most merchants end up using more than one: a storefront for browsing, the widget on marketing pages and payment links for one-off deals.
Tips for a high-converting embedded checkout
Put the button where the decision happens, next to the price and the key benefit, not only in the footer.
Use clear button text such as "Buy Pro for $49" rather than "Submit".
Show accepted methods near the button so crypto users know they are welcome.
Test on mobile; most impulse purchases happen on phones.
Payment processing Card + crypto checkout Developer docs
Frequently asked questions
Does the widget work with Framer, Webflow and WordPress?
Yes. Anywhere you can add a script tag and a custom attribute to a button, the widget works.
Do I need a backend?
No. Orders, payments and delivery run on PapelShip. If you want your own systems to react to purchases, add a webhook.
Can I sell several products on one page?
Yes. Each button carries its own product or group, so a single page can host as many checkouts as you need.
Is card data handled by my site?
No. Card payments are processed by the connected gateway; your page never touches card details.
Start selling from your own site
An embedded checkout is the fastest route from "I have a website" to "I take payments". Two lines of code, and every visitor is one click from buying.


